Preliminary configuration
The SSL standard, allowing access to sites with an encrypted connection (protocol HTTPS) is disabled by default in recent versions of Firefox.
The supported versions of Firefox are specified
here
The standards supported by default are: TLS 1.0 to TLS 1.2.
In case of problems, thank you to notify the issue to RTE’s Hotline (
here).
Installing RTE’s CAs certificates
Download and install
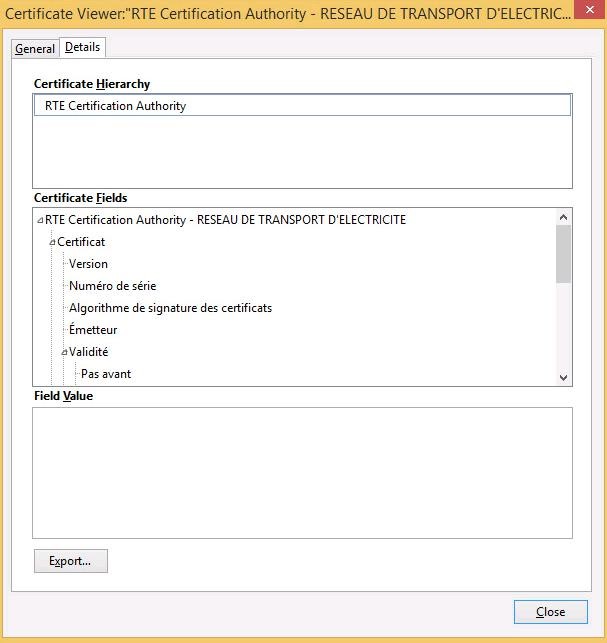
RTE Historical Certification Authority
IThis CA is the Historical CA of RTE, dealing with 2048 bit keys. This CA is necessary to ensure the cohabitation between the former and the latter PKIs.
RTE Historical CA certificate must now be installed in your browser so that it is recognized as a trusted Certificate Authority.
To do so, please go to the following address:
IMPORTANTE NOTE
It is imperative to respect the case (upper / lower case) of the site’s address.
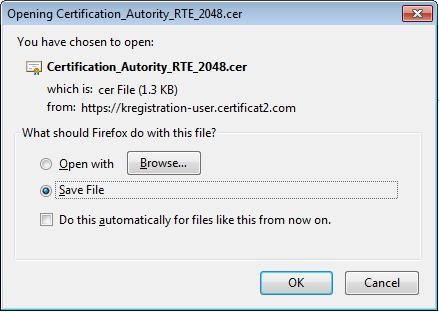
The following pop-up, in order to download the certificate, appears:
Select "Save file" then click "
OK".
A location to save the file "
Certification_Autority_RTE_2048.cer" will eventually be requested.
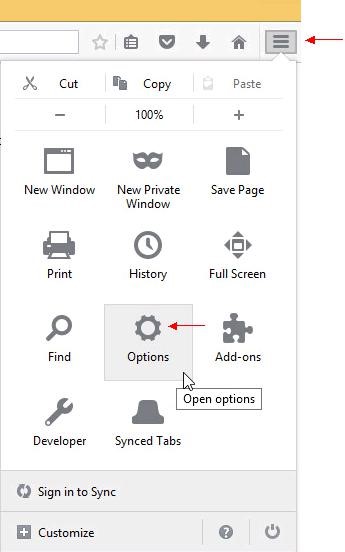
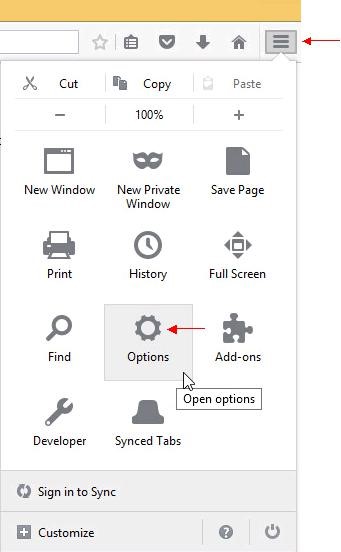
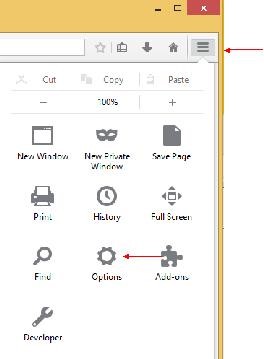
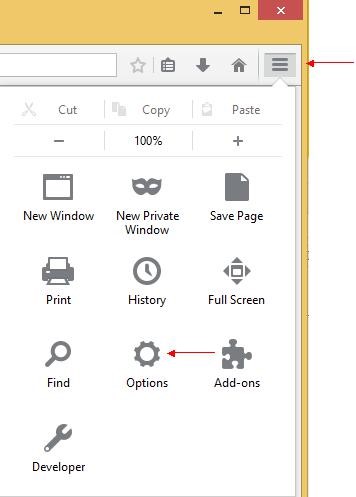
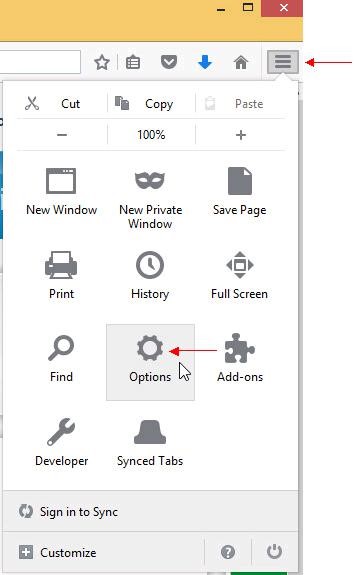
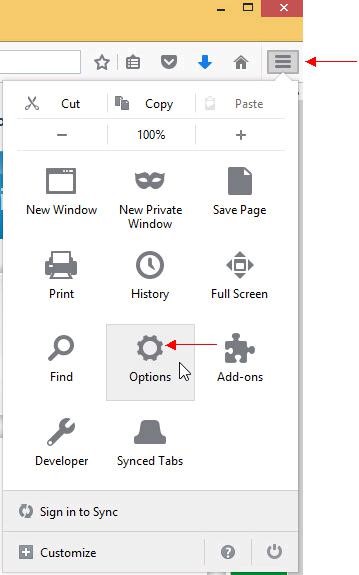
Once the file is downloaded, click the menu "
Tools" in the right corner of the window then click the icon "
Options":
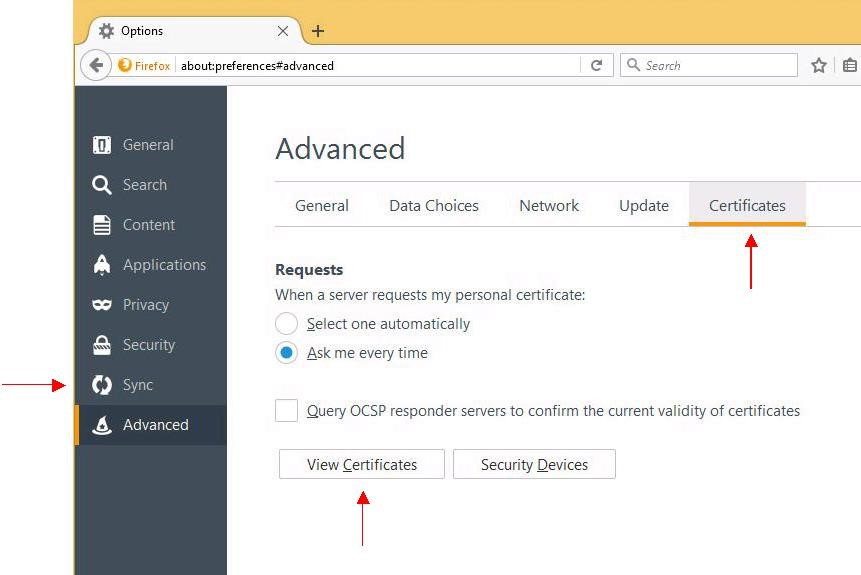
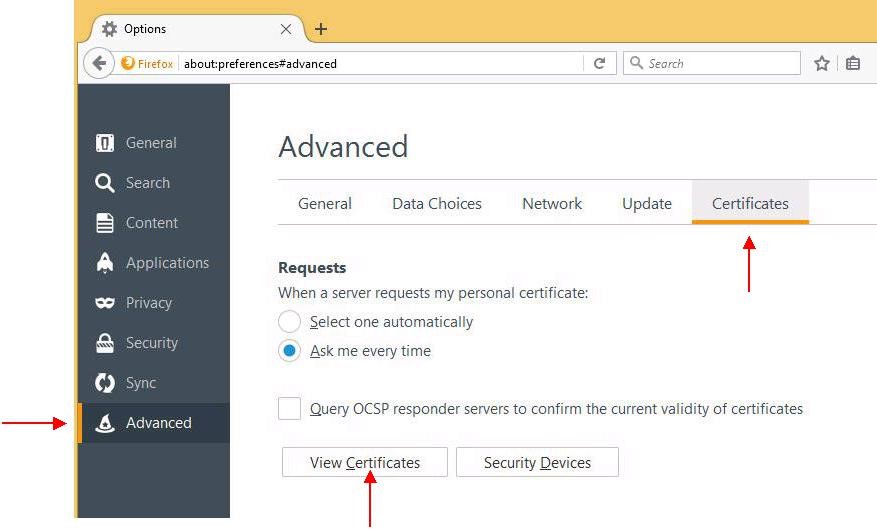
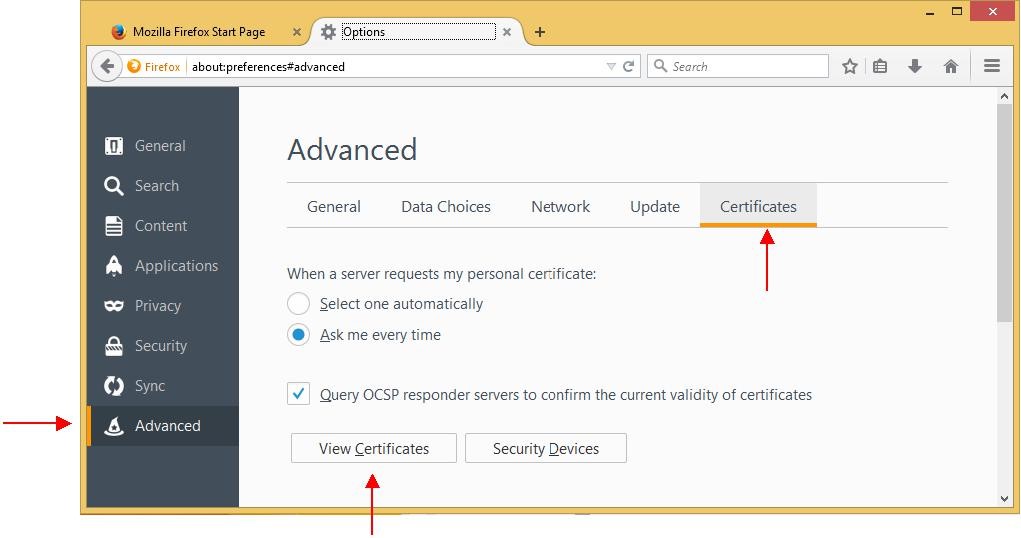
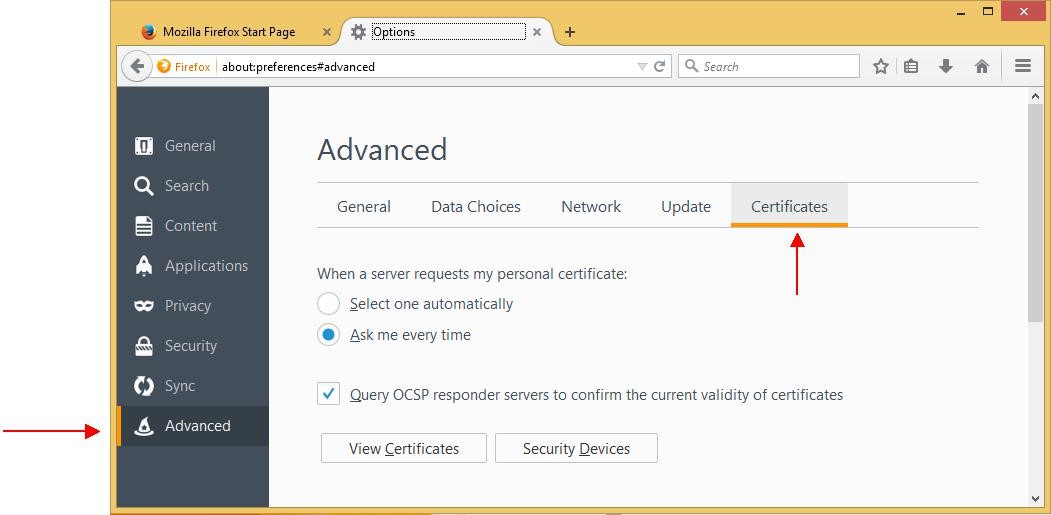
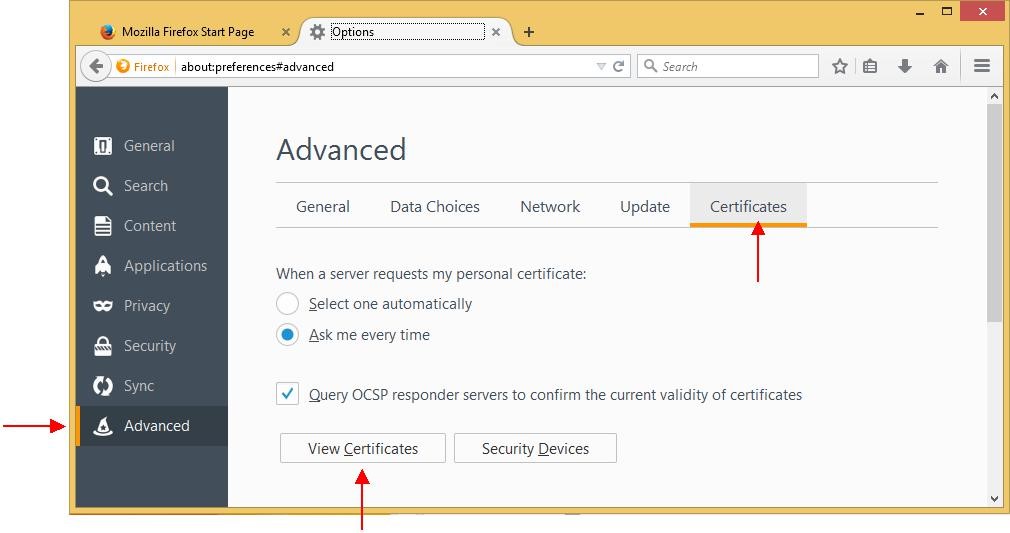
A window appears. Choose the "
Advanced" tab then the subcategory "
Certificates".
Click the "
View certificates" button.
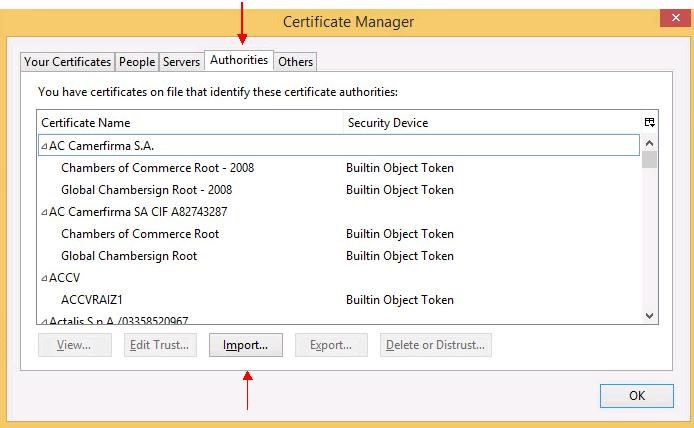
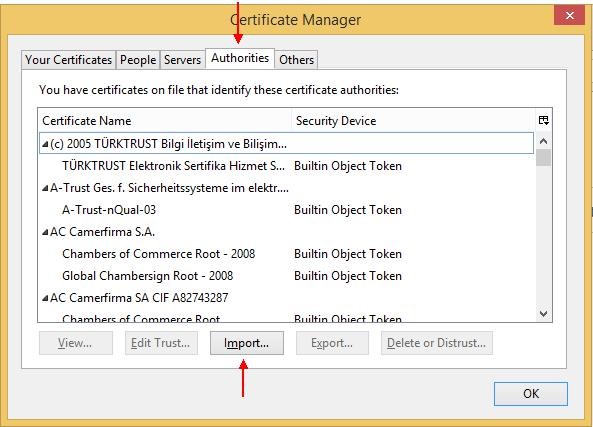
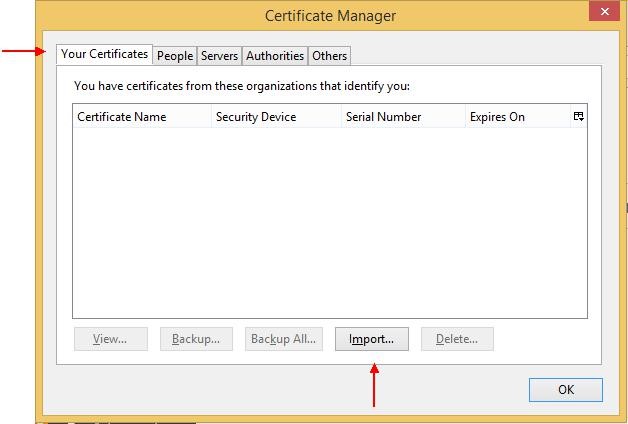
Select the "
Authorities" tab and click "
Import…".
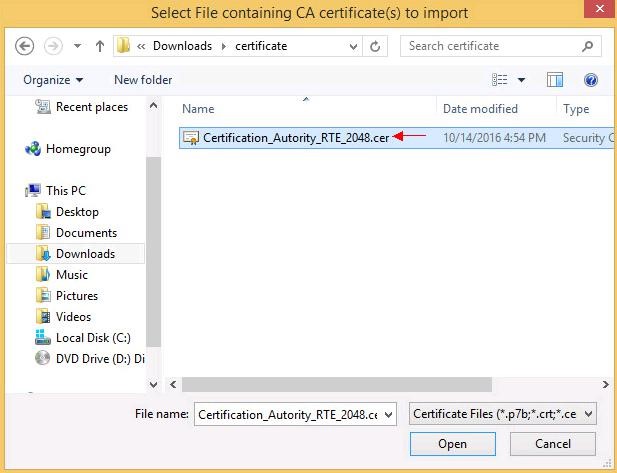
Select the previously saved file.
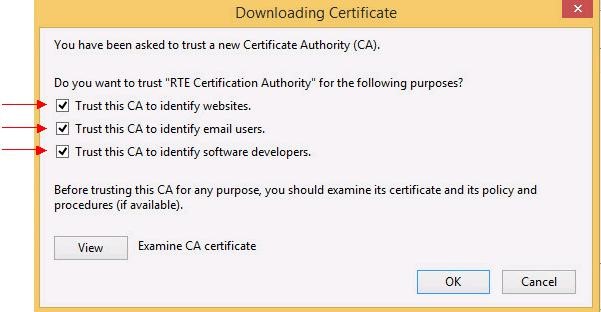
A dialog box is displayed, in which you must select the three check boxes "
Trust this CA to identify [...]" to trust RTE Historical CA.
Click "
View" to check that the certificate you just install is RTE Historical CA’s certificate:
To ensure that you have downloaded the real RTE Historical CA's certificate, check carefully that the "
SHA1" hash displayed is identical to the one shown below.
Digital hash of the certificate "RTE Certification Authority" SHA1
SHA1 39:83:D6:10:A2:C4:D5:60:45:A0:C1:D0:E3:FA:E1:42:45:8A:37:12
If this is not the case: click "
Close" to go back to the precedent window and click "
Cancel" then call RTE’s Hotline (
here).
If, after verification, the hash of the certificate that you imported matches the "
SHA1" hash above,
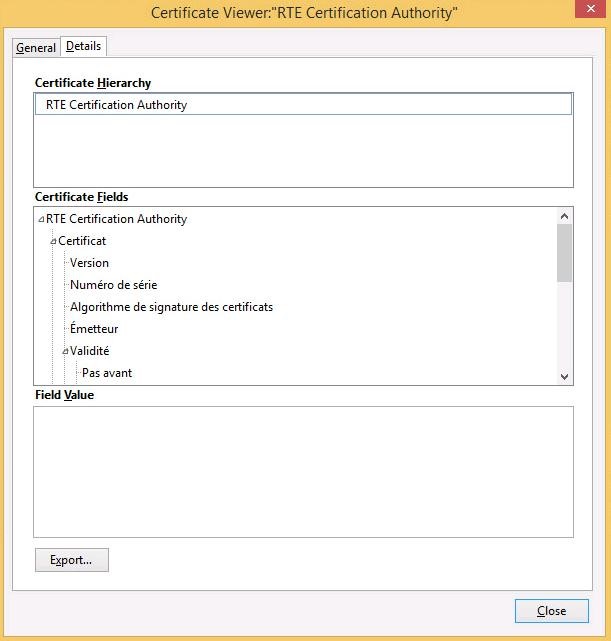
it is possible to consult the details of the certificate by clicking on the "
Details" tab:
By clicking on the "
Close" button, you return to the initial window.
Click "
OK". RTE Historical CA certificate is now installed in the certificate store of Mozilla Firefox
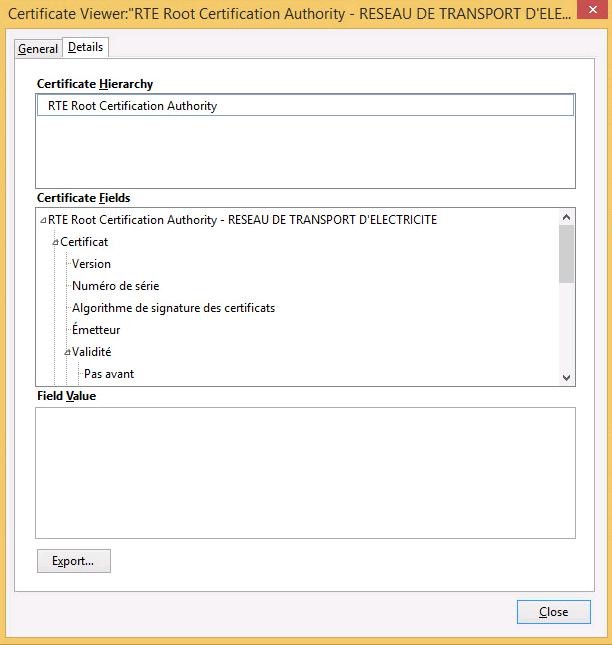
RTE Root Certification Authority
This CA is the new Root CA of RTE, dealing with 4096 bit keys. This CA is necessary to ensure the validation of the chain of trust.
RTE Root CA certificate must now be installed in your browser.
To do so, please go to the following address:
IMPORTANTE NOTE
It is imperative to respect the case (upper / lower case) of the site’s address.
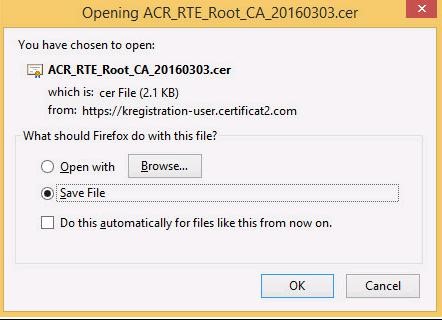
The following pop-up, in order to download the certificate, appears:
Select "
Save file" then click "
OK".
A location to save the file "ACR_RTE_Root_CA_20160303.cer" will eventually be requested.
Once the file is downloaded, click the menu "
Tools" in the right corner of the window then click the icon "
Options":
A window appears. Choose the "
Advanced" tab then the subcategory "
Certificates".
Click the "
View certificates" button.
Select the "
Authorities" tab and click "
Import…".
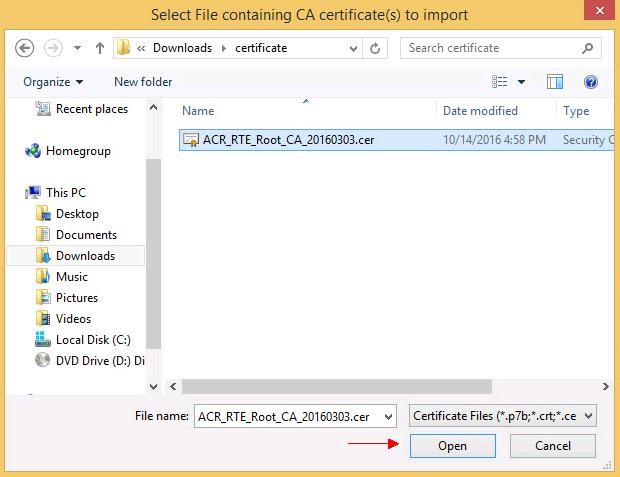
Select the previously saved file.
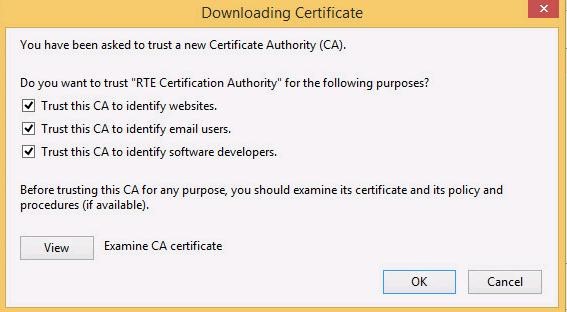
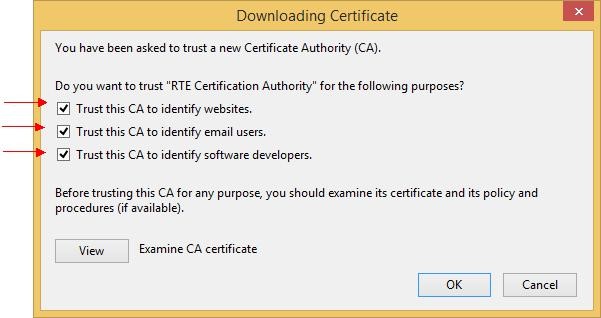
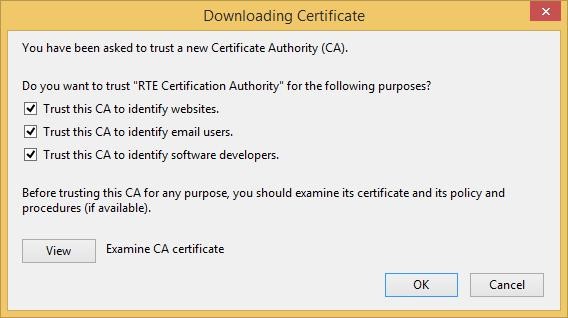
A dialog box is displayed, in which you must select the three check boxes "
Trust this CA to identify [...]" to trust RTE Root CA.
Click "
View" to check that the certificate you just install is RTE Root CA’s certificate:
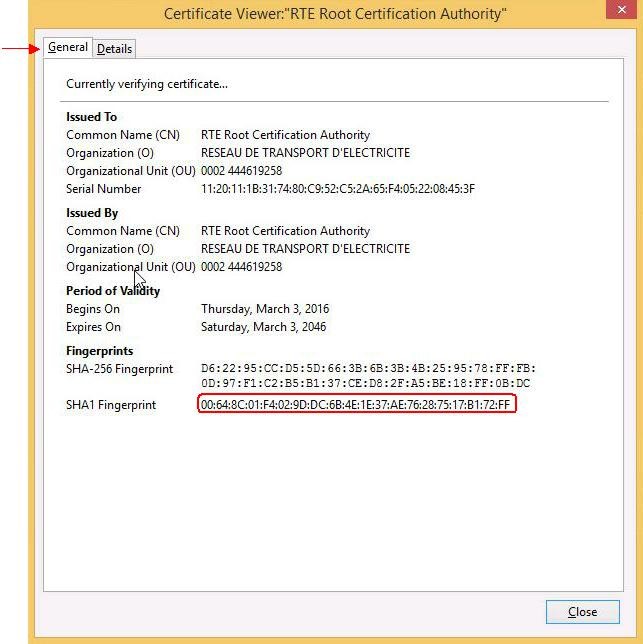
To ensure that you have downloaded the real RTE Root CA's certificate,
check carefully that the "
SHA1" hash displayed is identical to the one shown below.
Digital hash of the certificate "RTE Root Certification Authority"
SHA1 00:64:8c:01:f4:02:9d:dc:6b:4e:1e:37:ae:76:28:75:17:b1:72:ff
If this is not the case: click "
Close" to go back to the precedent window and click "
Cancel" then call RTE’s Hotline (
here).
If, after verification, the hash of the certificate that you imported matches the "
SHA1" hash above,
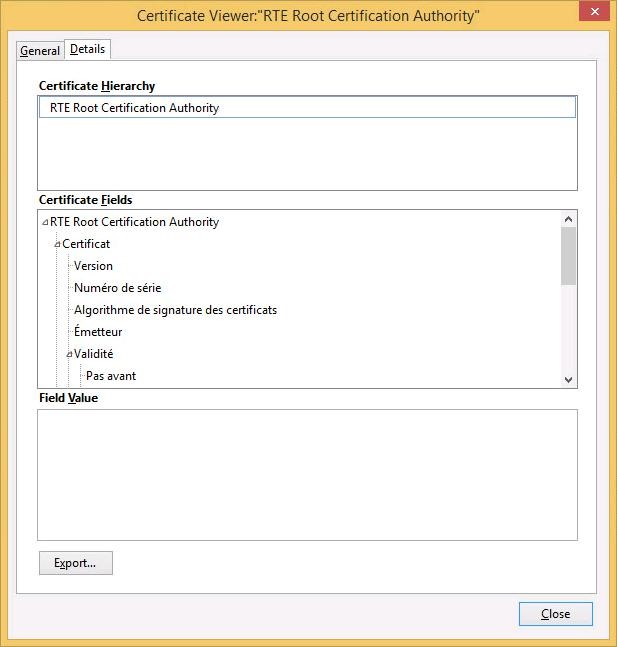
it is possible to consult the details of the certificate by clicking on the "
Details" tab:
By clicking on the "
Close" button, you return to the initial window.
Click "
OK". RTE Root CA certificate is now installed in the certificate store of Mozilla Firefox.
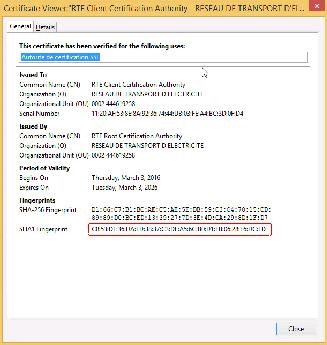
RTE Client Certification Authority
This CA is the new Client CA of RTE, dealing with 4096 bit keys. This CA is necessary to generate the new PKI’s certificates.
RTE Client CA certificate must now be installed in your browser.
To do so, please go to the following address:
IMPORTANTE NOTE
It is imperative to respect the case (upper / lower case) of the site’s address.
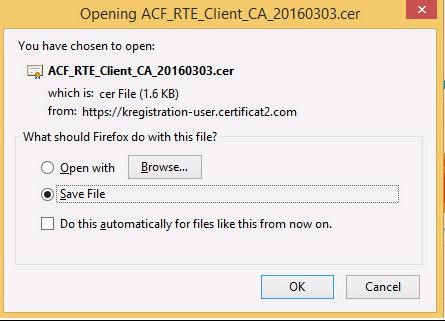
The following pop-up, in order to download the certificate, appears:
Select "
Save file" then click "
OK". A location to save the file "
ACF_RTE_Client_CA_20160303.cer" will eventually be requested..
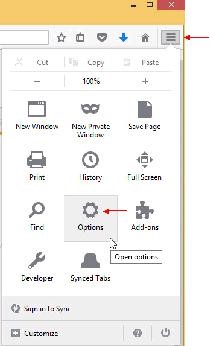
Once the file is downloaded, click the menu "
Tools" in the right corner of the window then click the icon "
Options":
A window appears. Choose the "
Advanced" tab then the subcategory "
Certificates".
Click the "
View certificates" button.
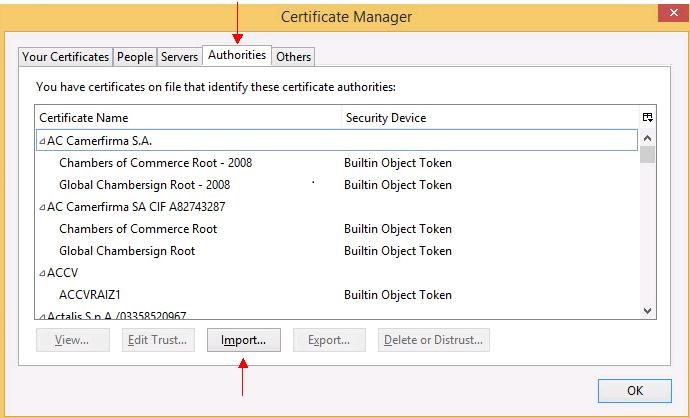
Select the "
Authorities" tab and click "
Import…"
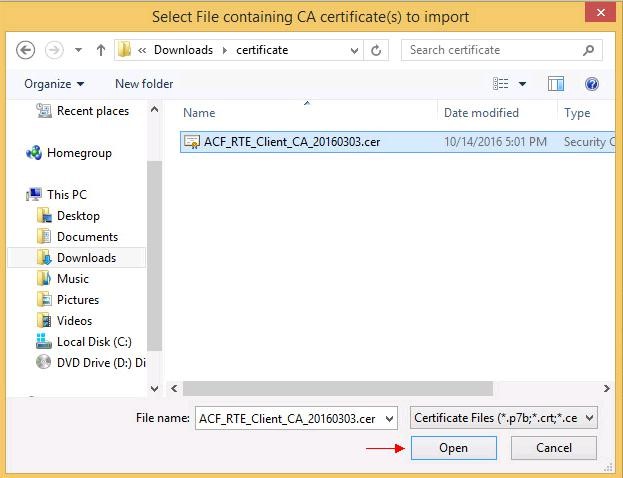
Select the previously saved file.
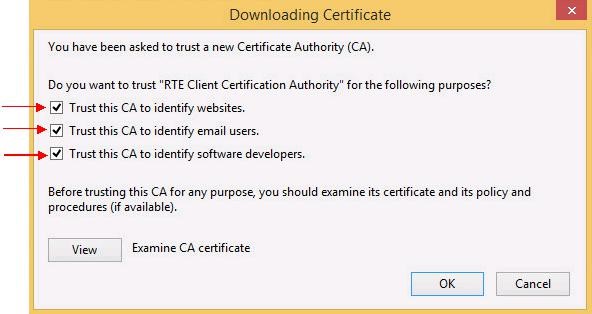
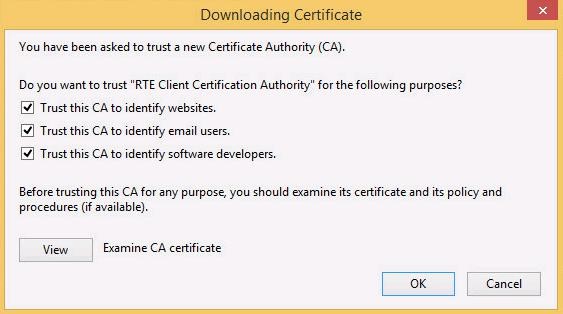
A dialog box is displayed, in which you must select the three check boxes "
Trust this CA to identify [...]" to trust RTE Client CA.
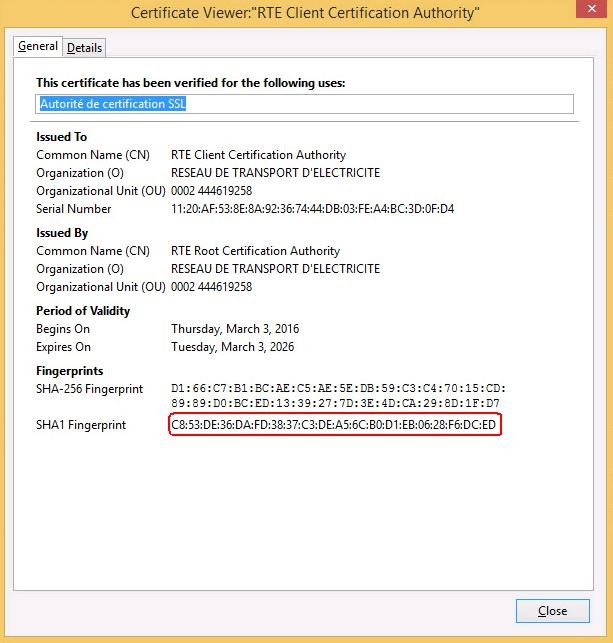
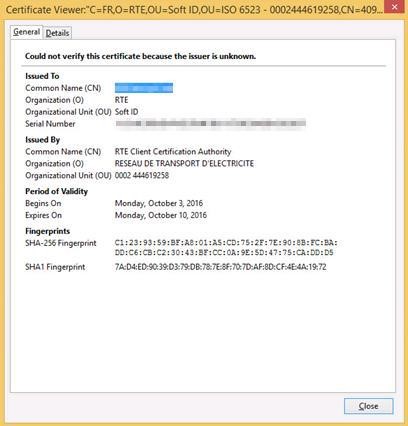
Click "
View" to check that the certificate you just install is RTE Client CA’s certificate:
To ensure that you have downloaded the real RTE Client CA's certificate, check carefully that the "
SHA1" hash displayed is identical to the one shown below.
Digital hash of the certificate "RTE Client Certification Authority"
SHA1 C8:53:de:36:da:fd:38:37:c3:de:a5:6c:b0:d1:eb:06:28:f6:dc:ed
If this is not the case: click "
Close" to go back to the precedent window and click "
Cancel" then call RTE’s Hotline (
here).
If, after verification, the hash of the certificate that you imported matches the "
SHA1" hash above,
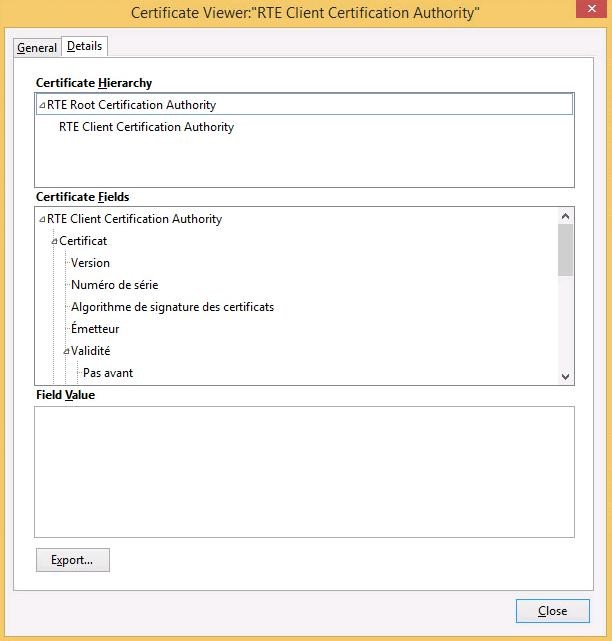
it is possible to consult the details of the certificate by clicking on the "
Details" tab:
By clicking on the "
Close" button, you return to the initial window.
Click "
OK". RTE Client CA certificate is now installed in the certificate store of Mozilla Firefox.
Visualization and verification of RTE CAs certificates
To see the certificates in Mozilla Firefox, click the menu "Tools" in the right corner of the window then click the icon "
Options":
A window appears. Choose the "
Advanced" tab then the subcategory "
Certificates".
Click the "
View certificates" button.
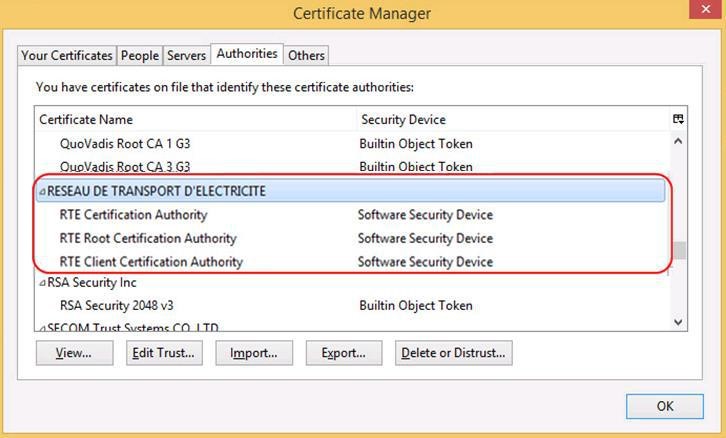
In "
Authorities" tab, you can verify that the certificates you import are register with "
RESEAU DE TRANSPORT D’ELECTRICITE"
organization and are saved on your computer disk ("
Software Security Device").
You can see the content of each certificate by clicking on the certificate and then clicking on "
View".
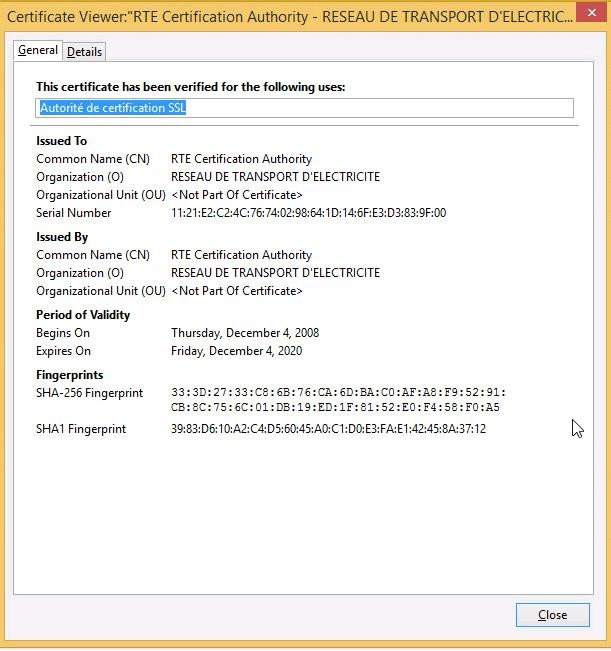
Select "
RTE Certification Authority" and click "
View":
To ensure that you have downloaded the real RTE Historical CA's certificate,
check carefully that the "
SHA1" hash displayed is identical to the one shown below.
Digital hash of the certificate "RTE Certification Authority" SHA1
SHA1 39:83:D6:10:A2:C4:D5:60:45:A0:C1:D0:E3:FA:E1:42:45:8A:37:12
If this is not the case: click "
Close" to go back to the precedent window and call RTE’s Hotline (
here).
If, after verification, the hash of RTE Historical CA certificate that you imported matches the "
SHA1" hash above,
it is possible to consult the details of the certificate by clicking on the "
Details" tab:
By clicking on the "
Close" button, you return to the initial window.
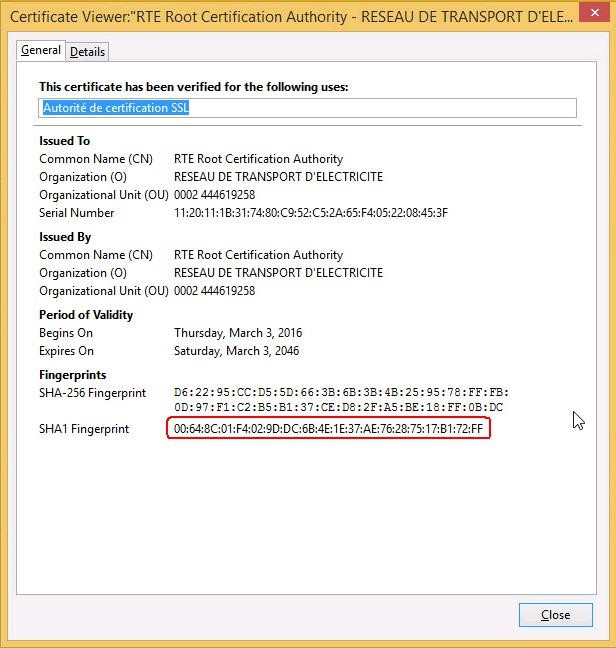
Select "
RTE Root Certification Authority" and click "
View":
To ensure that you have downloaded the real RTE Root CA's certificate,
check carefully that the "
SHA1" hash displayed is identical to the one shown below.
Digital hash of the certificate "RTE Root Certification Authority" SHA1
SHA1 00:64:8c:01:f4:02:9d:dc:6b:4e:1e:37:ae:76:28:75:17:b1:72:ff
If this is not the case: click "
Close" to go back to the precedent window and call RTE’s Hotline (
here).
If, after verification, the hash of RTE Root CA certificate that you imported matches the "
SHA1" hash above,
it is possible to consult the details of the certificate by clicking on the "
Details" tab:
By clicking on the "
Close" button, you return to the initial window.
Select "
RTE Client Certification Authority" and click "
View":
To ensure that you have downloaded the real RTE Client CA's certificate,
check carefully that the "
SHA1" hash displayed is identical to the one shown below.
Digital hash of the certificate "RTE Client Certification Authority" SHA1
SHA1 C8:53:de:36:da:fd:38:37:c3:de:a5:6c:b0:d1:eb:06:28:f6:dc:ed
If this is not the case: click "
Close" to go back to the precedent window and call RTE’s Hotline (
here).
If, after verification, the hash of RTE Client CA certificate that you imported matches the "
SHA1" hash above,
it is possible to consult the details of the certificate by clicking on the "
Details" tab:
By clicking on the "
Close" button, you return to the initial window.
Installing your personal certificate
Authentication on the retrieval interface
The software certificate request must have been completed.
To proceed to the retrieval you need the following information (
see here):
- The chosen password you have chosen and supplied to RTE in the form to request access to RTE’s IS (here).
- Certificate email, Retrieval code and Password for the PKCS#12 file included in the email "Access to RTE’s IS services" (here).
For your convenience you can copy and paste different values being careful not to copy any space at the beginning or end.
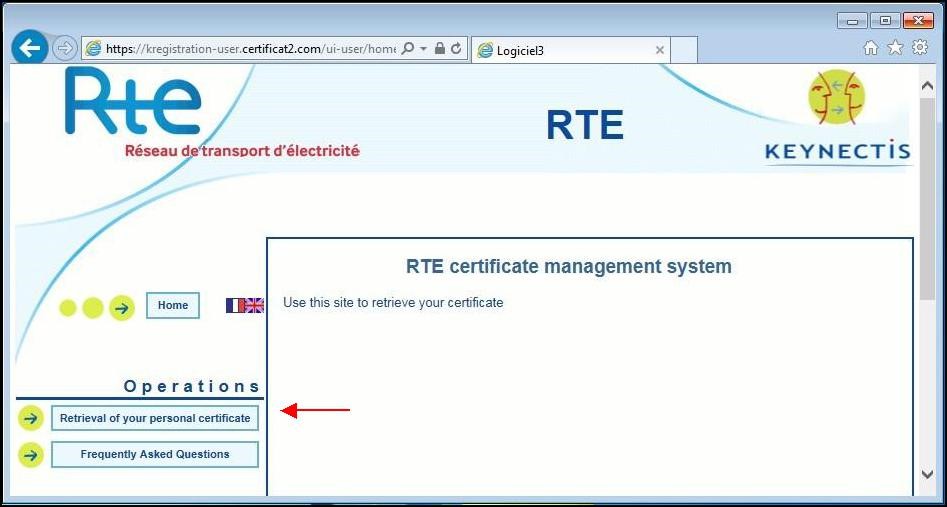
To create your certificate and the associated private key, log on the certificate retrieval website:
IMPORTANTE NOTE
It is imperative to respect the case (upper / lower case) of the site’s address.
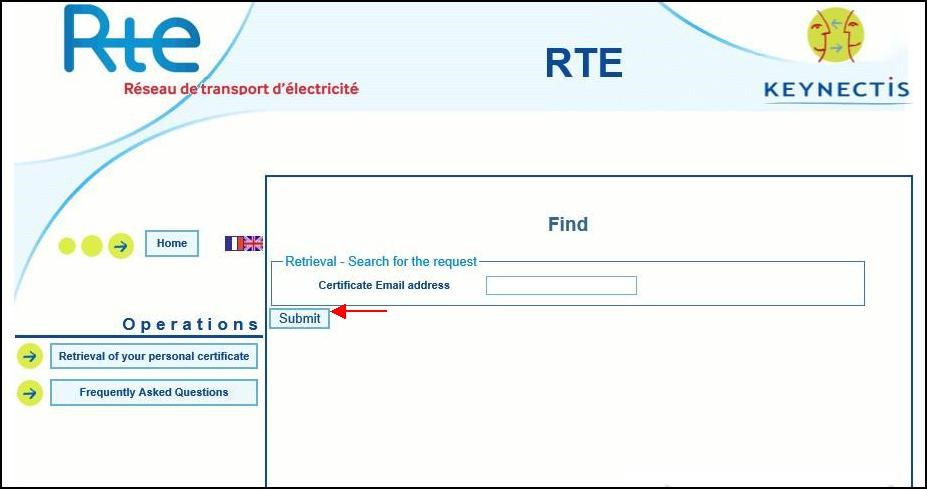
Click the button "
Retrieval of your personal certificate".
Fill the field "
Certificate email" with the value indicated in the email "
Access to RTE’s IS services" (
here).
Click "
Submit".
Please complete the following:
- "Retrieval code" as indicated in the email "Access to RTE’s IS services" (here).
- "Chosen password" which is the password you chose and provided to RTE in the form to request access to RTE’s IS (here).
Finally, click "
Submit".
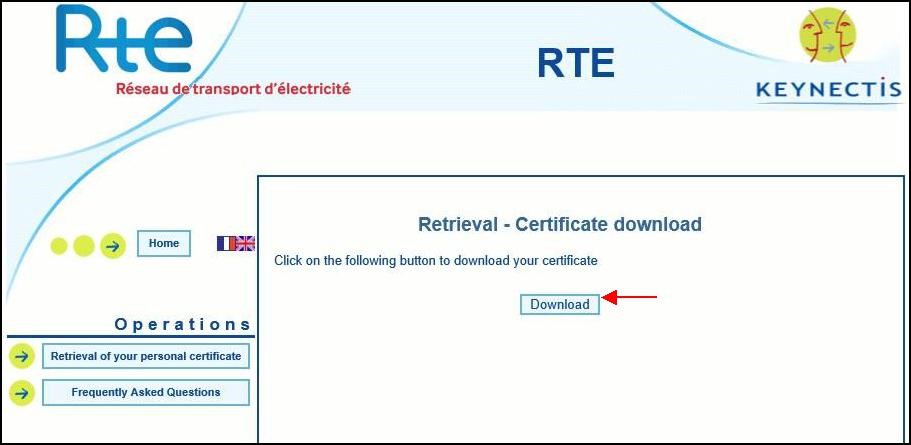
Download of your certificate
The following page appears.
Click "
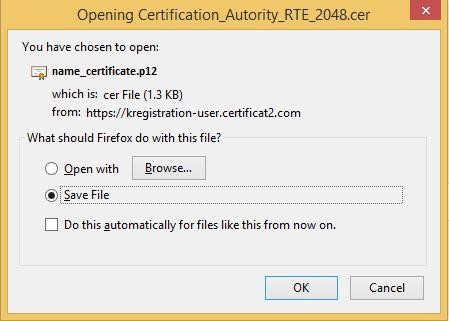
Download".
In the window that appears, click "
Save" then "
OK".
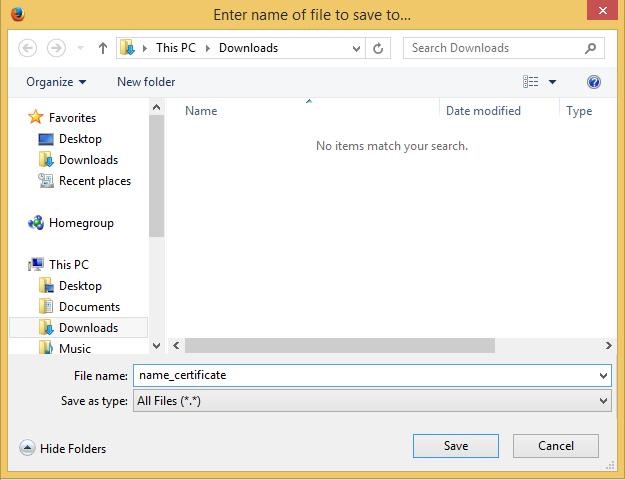
Choose a directory to save your certificate, then click "
Save".
IMPORTANT NOTE
Once downloaded, the PKCS#12 file (extension "
.p12") containing your certificate and its associated private key must be stored
on a removable media (USB stick, an external hard drive), that you have to put into a safe in order to protect access to it.
Also keep the mail "
Access to RTE's IS services"(
see here) that contains the password.
Installation of your personal certificate
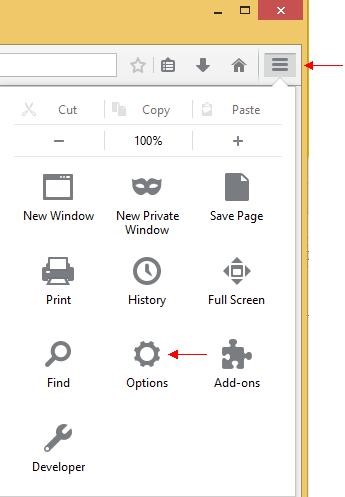
In Firefox, go to the menu "
Tools" on the top right of the window and click the "
Options" icon:
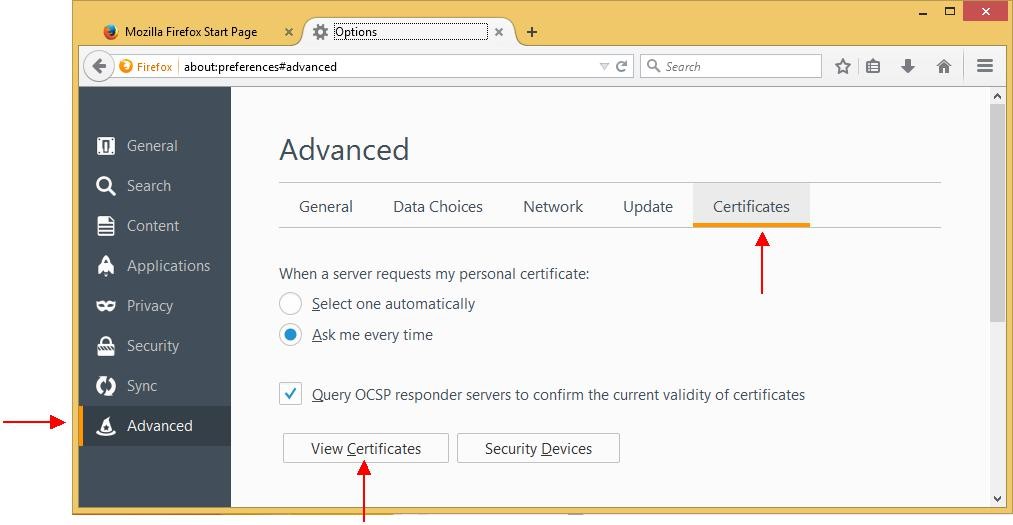
A window appears. Choose the tab "
Advanced" then the subcategory "
Certificates".
Click "
View Certificates".
Click "
Import…".
Go to the folder you saved your certificate in, select your certificate "
name_certificate.p12" and click "
Open".
If necessary, the window below will ask you the access password to the Mozilla Firefox certificate store
(
click here to set this password):
Enter it and click "
OK". The window below appears.
Enter the "
Password" present in the email "
Access to RTE’s IS services"
(
see here), then click "
OK".
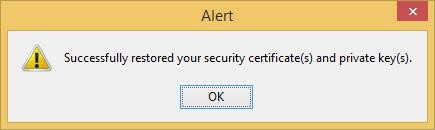
Your certificate and its associated private key have been successfully imported in Mozilla Firefox’s certificate store.
Visualization and verification of your software certificate
Regardless of the browser used, the content of the downloaded certificate is obviously the same, only the presentation of information on the screen differs.
In the case of Mozilla Firefox, go to the "
Tools" menu (top-right corner of the window) then click the "
Options" icon:
A window appears. Choose the "
Advanced" tab then the "
Certificates" subcategory.
Then click the "
View Certificates" button.
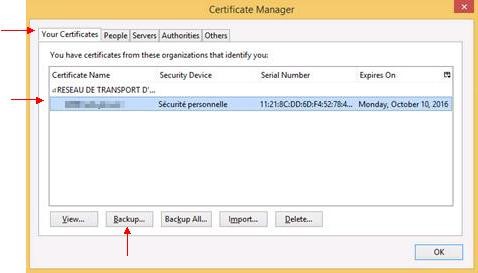
Select the tab "
Your Certificates".
The certificate is a software certificate: indeed, the "
Software Security Dev…" indication appears at the right of its name.
You can view it by selecting it and clicking "
View…".
The first tab "
General" displays the following message "
This certificate has been verified for the following uses".
It is valid for 3 years from the date of withdrawal.
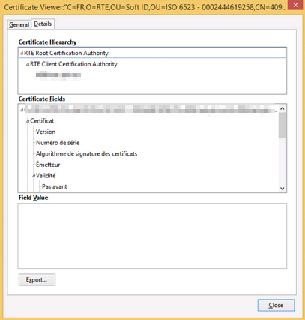
The second tab "
Details" displays the certification hierarchy with the trust chain.
This ensures that all certificates have been installed correctly, and that all the correct conditions of your certificate are met.
Using your certificate
Authentication and encryption
Steps to follow
- Run Mozilla Firefox,
- Enter the URL to RTE’s application or to "RTE’s customer service portal": https://portail.iservices.rte-france.com
- During the authentication, the browser will ask you to select the certificate to use for authentication then (if it has been defined) the certificate store protection password,
- If multiple certificates are presented, you must choose the one supplied for the application
you wish to access (use the button
"Display certificate" to visualize its content).
Once authentication is completed, all data you send or receive will be encrypted
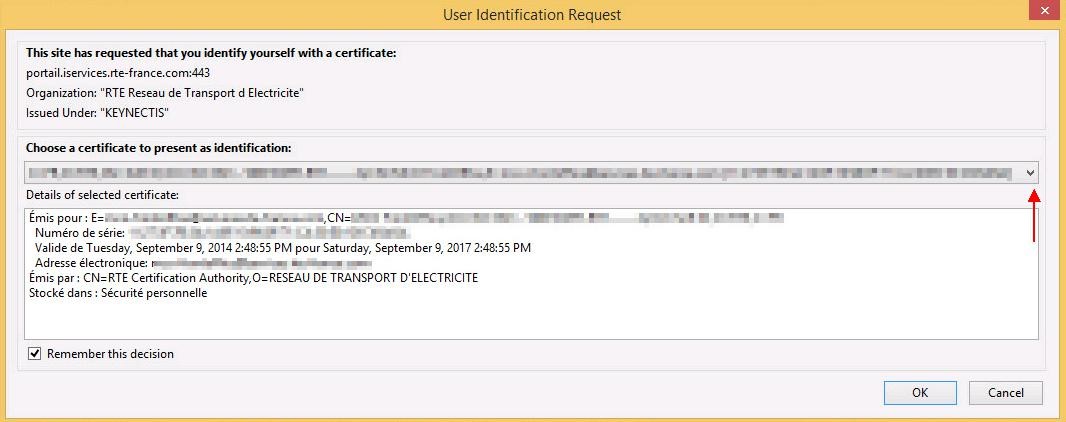
Example of access to an RTE web application
When you access the
https://portail.iservices.rte-france.com, homepage, you will be asked to choose your certificate.
Select your certificate from the drop down list entitled "
Choose a certificate to present as identification" then click "
OK".
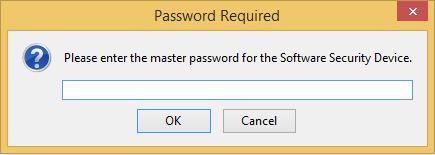
The following window will ask you the access password to the Mozilla Firefox certificate store if it was defined.
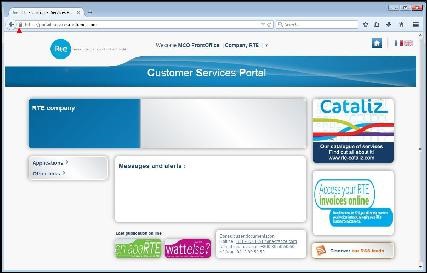
The home page is then securely displayed, (appearance of the closed padlock near to the URL entry field):
Additional operations
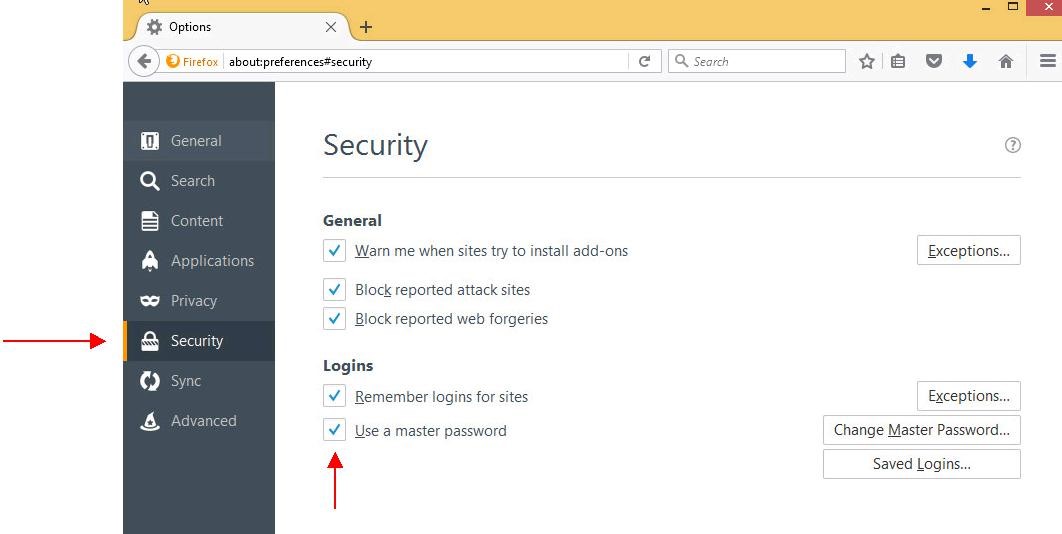
Defining the master password for personal security
To protect the private key associated with your certificate it is strongly recommended to set a personal security password.
To do this, click the "
Tools" menu on the top right of the window and click on the "
Options" icon:
A window appears. Choose the "
Security" tab.
If "
Use a master password" is already checked, it means you already have a personal security password, and you have nothing to do.
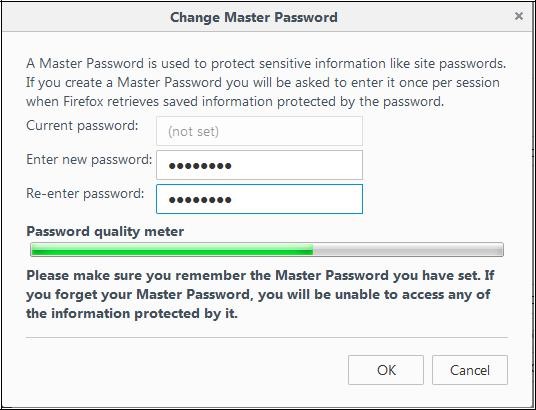
Otherwise, check the "
Use a master password" case. The following window appears:
Enter your new master password in both fields and click "
OK".
Your personal security password is now defined.
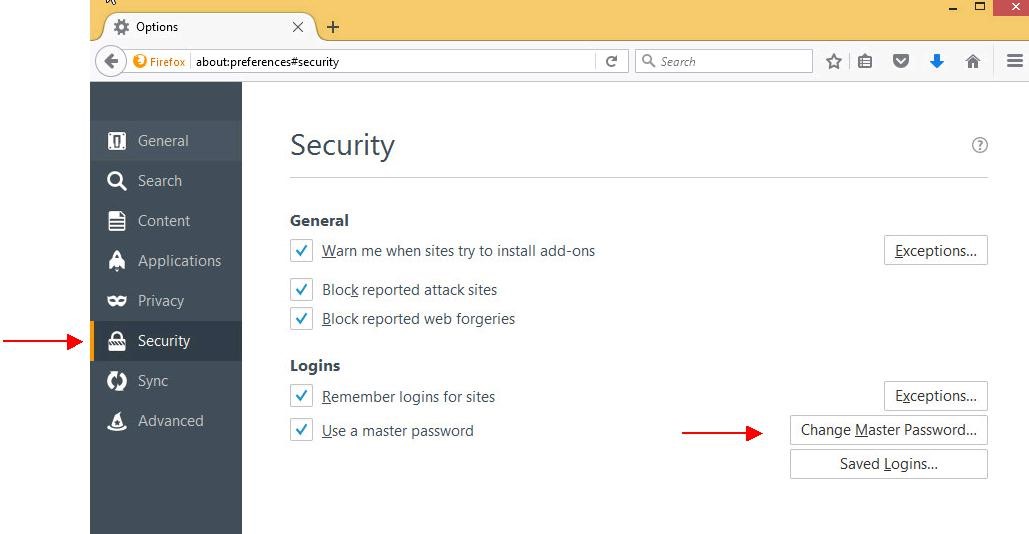
You can change your personal security password at any time by going to the menu "
Tools" on the top right of the window and clicking the "
Options" icon.
A window appears. Choose the "
Security" tab and click "
Change Master Password…".
Export of your personal certificate
This section explains how to save the certificate with its private key and trust chain.
The procedure is to generate a file in PKCS#12 format ("
.p12"), protected by a password.
Go the "
Tools" menu at the top-right corner of the window then click the "
Options" icon:
A window appears. Choose the "
Advanced" tab then the "
Certificates" subcategory.
Then click "
View Certificates…".
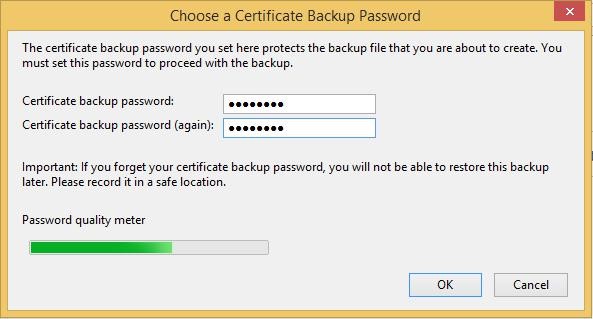
Select your certificate and click "
Backup…":
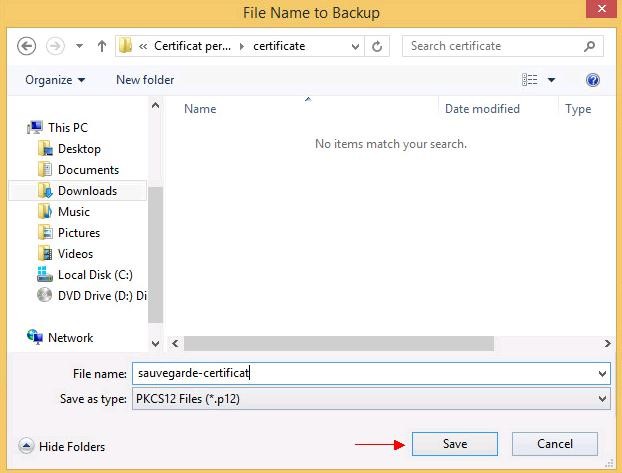
Choose a folder and a name for the output file in PKCS#12 format (extension "
.p12"):
Click "
Save".
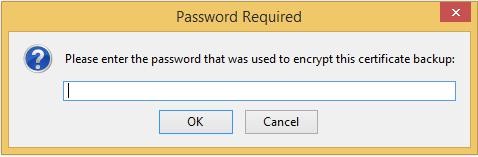
If necessary, the following window will ask you the access password to the Mozilla Firefox certificate store:
Then the following window appears:
Enter a password of your choice to protect access to the PKCS#12 file and click "
OK".
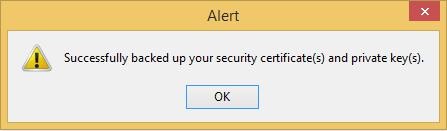
Your certificate, your private key and the trust chain are exported in the PKCS#12 generated file (extension "
.p12").
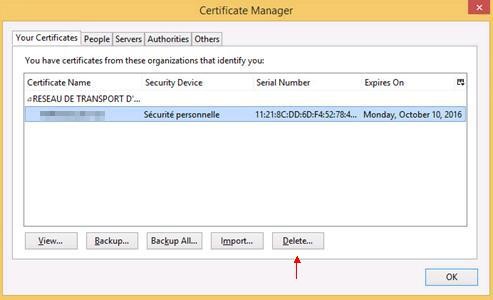
Deleting your personal certificate
This section details the procedure to remove a certificate and its private key from Mozilla Firefox’s Certificate store.
IMPORTANT NOTE
Before deleting your personal certificate, make sure to have a copy.
If this is not the case, refer to
here to export your certificate and private key as a PKCS#12 file.
Go to the "
Tools" menu at the top-right corner of the window then click the "
Options" icon:
A window appears. Choose the "
Advanced" tab then the "
Certificates" subcategory.
Then click "
View Certificates...".
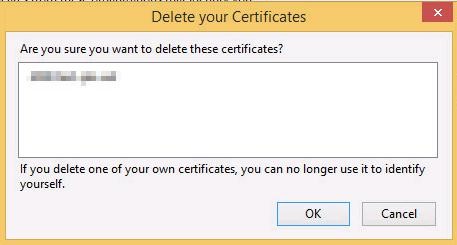
Select your certificate and click "
Delete…".
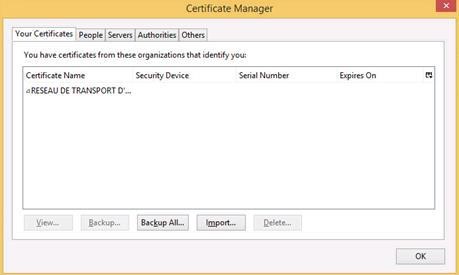
Validate by clicking "
OK".
The certificate is then removed from the list of certificates.
Connecting to the SSL VPN
Foreword
The connection via SSL VPN is a service for establishing a secure communications channel to RTE’s FrontOffice via the Internet.
This channel is established after authenticating with your certificate from a dedicated website (
see here).
Once the channel is established all communications with the requested RTE service will be encrypted.
LThe use of SSL VPN requires the installation of a dedicated tool, installed during the first login to the site.
The application is called Secure Application Manager (SAM).
SSL VPN enables secure access to your mailboxes hosted on RTE’s FrontOffice.
Prerequisite
In order to connect to the SSL VPN with Firefox, Java SE Runtime Environment (JRE) 1.5.07 or higher needs
to be installed on your workstation. If this is not the case, you can download the latest version on Oracle’s website:
http://java.com/fr/download/index.jsp
IMPORTANT NOTE
Before your first connection, you must verify that your workstation can resolve
the address
secure.iservices.rte-france.com (
click here).
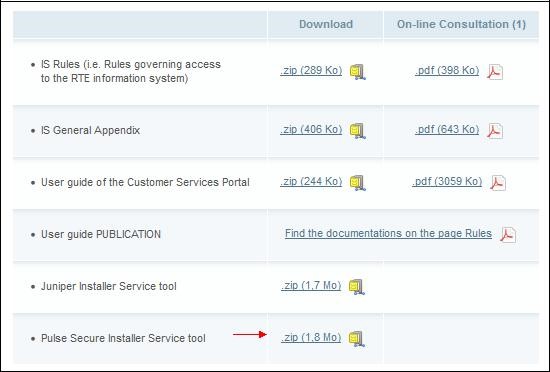
PPSIS (Pulse Secure Installation Service) is a Windows service made available on the RTE customer site.
This service allows, once installed, to update future SAM versions without requiring the intervention of a person with administrator privileges on the machine.
To do so, download the executable under the link:
http://clients.rte-france.com/lang/an/visiteurs/accueil/portail.jsp
And decompress the compressed file:
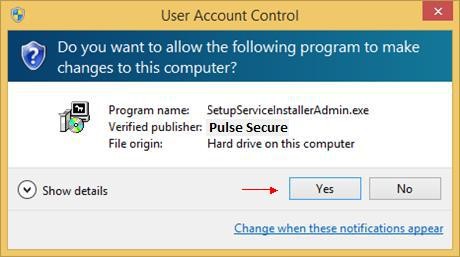
Once the file is executed, the following window appears. Click
"Yes".
This enables the service installation to start.
It will be automatically activated at every operating system launch.
First connection
This paragraph applies only to your first login to the SSL VPN with Mozilla Firefox.
IMPORTANT
The first connection must be made by a computer specialist
with Administrator rights on your workstation in order to install the SAM application.
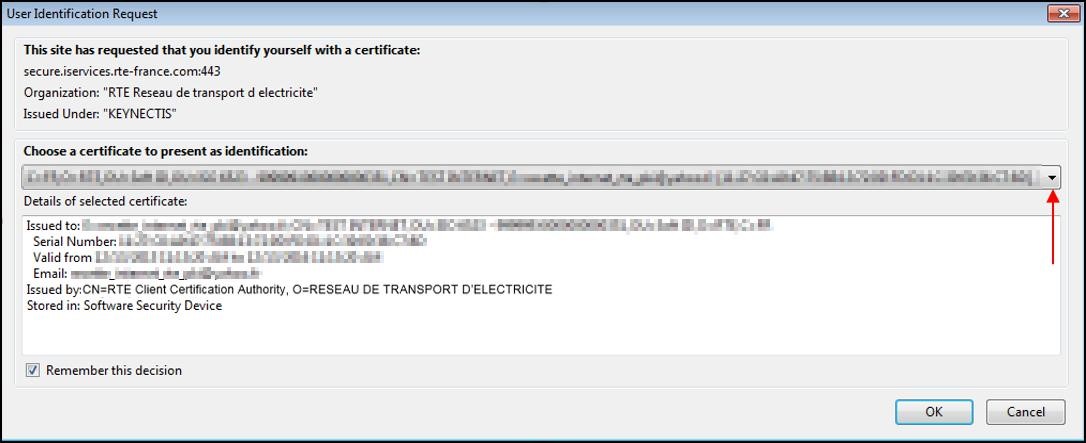
Lunch your Mozilla Firefox browser and go on the following website:
The following window appears:
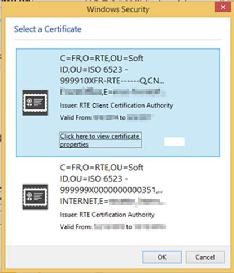
Select your certificate from the dropdown list entitled "
Choose a certificate to present as identification" and click
"OK".
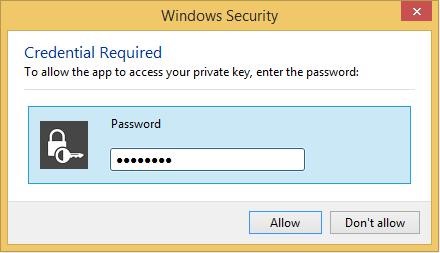
If necessary, the following window will ask you the access password to the Mozilla Firefox certificate store.
If a window asking you permission to execute a script from "
Pulse Secure, LLC." appears, click "
Yes".
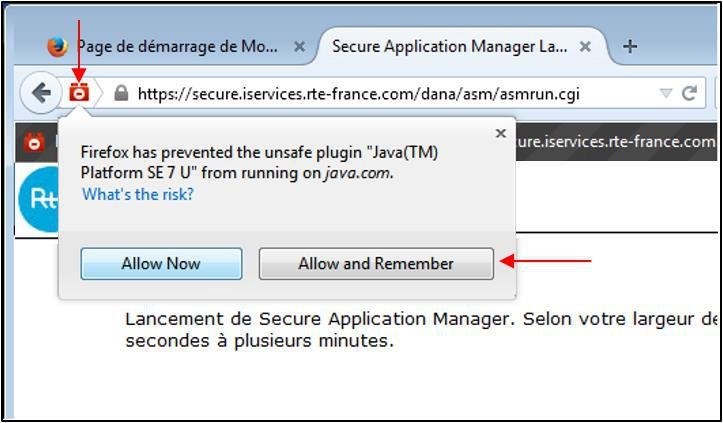
If the following red icon appears, click it in the address bar.
Then in the dropdown menu of the message, select "
Activate all plugins" and then choose "
Allow and remember".
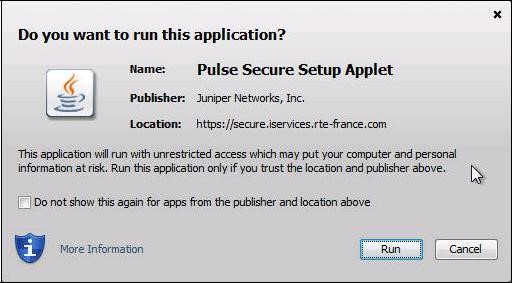
The following window appears, click "
Run":
If necessary, the following window appears:
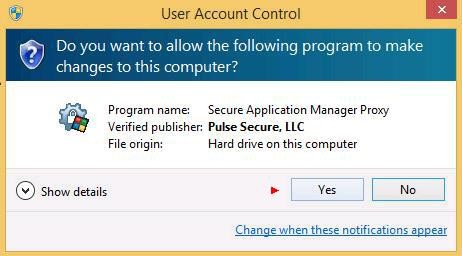
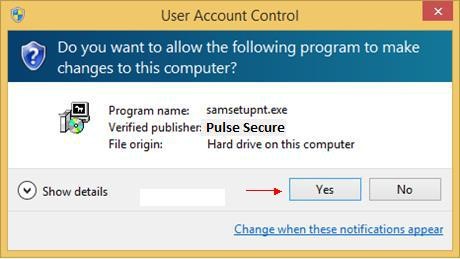
If the window below appears, click "
Yes".
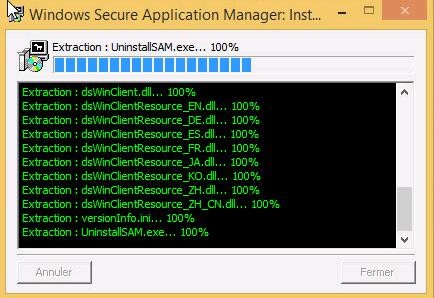
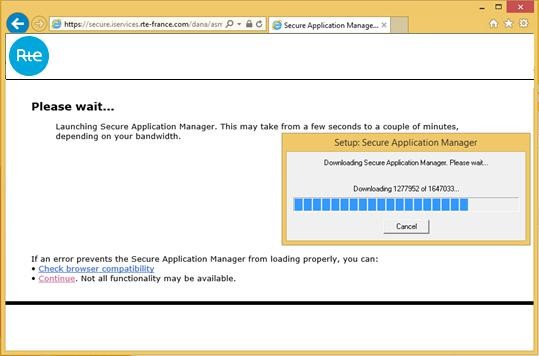
The installation of the SAM application starts:
If your Internet access requires authentication to a proxy, a window appears asking your login and password. Enter them and confirm.
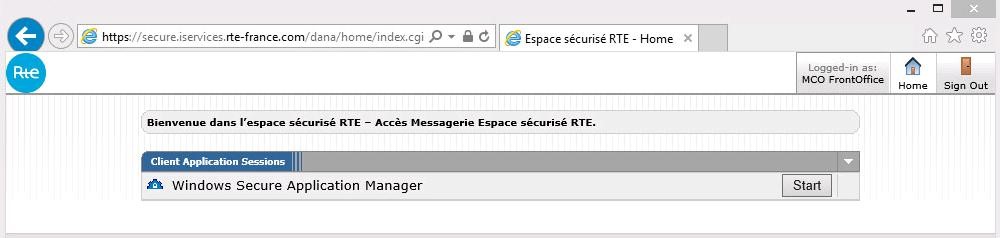
Then the window below appears:
Then, the icon

appears in your task-bar which means you are now connected to the SSL VPN.
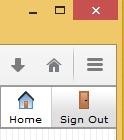
Click the "
Sign out" button (top right of the page) to end the session:
Using the SSL VPN
Establishing the connection
Run your browser and access the following website:
The following window appears:
Select your certificate from the dropdown list entitled "
Choose a certificate to present as identification" and click "
OK".
If necessary, the following window will ask you the access password to the Mozilla Firefox certificate store.
If a window appears asking you permission to execute a script from "
Pulse Secure, LLC.": click "
Yes"
If your Internet access requires authentication to a proxy, a window appears asking your login and password. Enter them and confirm.
Then the window below appears:
Then, the icon
appears in your taskbar which means you are now connected to the SSL VPN.
Notes
- The certificate is only used to establish the connection to the SSL VPN.
- To close the SSL VPN session, click on the "Sign out" button (top right of the page).
Use to access hosted mailboxes
The SSL VPN can be used to access mailboxes hosted on the FrontOffice with a standard email client.
Access to hosted mailboxes requires the SSL VPN connection to be established (
see here).
The Email account configuration in your mail client is then to be made with the following parameters:
- Incoming Mail server :
- Type of server : POP3
- Address (server hostname) : pop.services.rte-france.com
- Port : 110
- Cipher SSL : None
- Authentication : Password
- Outgoing Mail server :
- Type of server : SMTP
- Address (server hostname) : smtp.services.rte-france.com
- Port : 25
- Cipher SSL : None
- Authentication : None
When your access to RTE’s FrontOffice is provided, you will receive your login name, your password and your email address.
NOTE
Since the messages are transferred through a secure channel (everything that passes through this channel is automatically encrypted),
sending and receiving e-mail messages does not require the use of a certificate for message encryption.